Playwright framework implementation - Part 1
-
 Eric Stanley
- September 30, 2022

Let’s see the implementation of the playwright framework from the github repo which I created as part of my hands-on effort.
Now before I begin, I just wanted to give a little heads-up. This could be a long post and you might have to spend some quality time in order to make the framework up and running. That being said, I will try to reduce the words as much as possible and explain things clear. However, just keep an open mind for now 😉
Couple of things before we start. Let’s quickly spend some time in understanding how the framework is structured, so that you can have a mental picture of how things work when you start making changes.
Framework structure
.
├── 📁 src
│   ├── 📁 apps
│   │   └── 📁 common
│   │   │   ├── 📁 pages
│   │   │   │   ├── 📃 common.page.ts # common page shared b/w apps
│   │   └── 📁 app 01
│   │   │   ├── 📁 data
│   │   │   │   ├── 📃 page_01.data.json # data for app 01, page 01
│   │   │   │   ├── 📃 page_02.data.json # data for app 01, page 02
│   │   │   │   ├── 📃 ...
│   │   │   │   ├── 📃 page_n.data.json # data for app 01, page n
│   │   │   ├── 📁 fixtures
│   │   │   │   └── 📃 index.ts # app 01 specific fixtures
│   │   │   ├── 📁 locators
│   │   │   │   ├── 📃 page_01.locator.ts # locators for app 01, page 01
│   │   │   │   ├── 📃 page_02.locator.ts # locators for app 01, page 02
│   │   │   │   ├── 📃 ...
│   │   │   │   ├── 📃 page_n.locator.ts # locators for app 01, page n
│   │   │   ├── 📁 pages
│   │   │   │   ├── 📃 page_01.page.ts # functions for app 01, page 01
│   │   │   │   ├── 📃 page_02.page.ts # functions for app 01, page 02
│   │   │   │   ├── 📃 ...
│   │   │   │   ├── 📃 page_n.page.ts # functions for app 01, page n
│   │   │   └── 📁 tests
│   │   │   │   ├── 📃 page_01.spec.ts # tests for app 01, page 01
│   │   │   │   ├── 📃 page_02.spec.ts # tests for app 01, page 02
│   │   │   │   ├── 📃 ...
│   │   │   │   ├── 📃 page_n.spec.ts # tests for app 01, page n
│   │   │   ├── 📃 config.json # config data for app 01
│   │   │   ├── 📃 package.json # scripts for app 01
│   │   │   ├── 📃 playwright.config.ts # config details for app 01
│   │   └── 📁 app 02
│   │   │   ├── 📁 data
│   │   │   │   ├── 📃 page_01.data.json # data for app 02, page 01
│   │   │   │   ├── 📃 page_02.data.json # data for app 02, page 02
│   │   │   │   ├── 📃 ...
│   │   │   │   ├── 📃 page_n.data.json # data for app 02, page n
│   │   │   ├── 📁 fixtures
│   │   │   │   └── 📃 index.ts # app 02 specific fixtures
│   │   │   ├── 📁 locators
│   │   │   │   ├── 📃 page_01.locator.ts # locators for app 02, page 01
│   │   │   │   ├── 📃 page_02.locator.ts # locators for app 02, page 02
│   │   │   │   ├── 📃 ...
│   │   │   │   ├── 📃 page_n.locator.ts # locators for app 02, page n
│   │   │   ├── 📁 pages
│   │   │   │   ├── 📃 page_01.page.ts # functions for app 02, page 01
│   │   │   │   ├── 📃 page_02.page.ts # functions for app 02, page 02
│   │   │   │   ├── 📃 ...
│   │   │   │   ├── 📃 page_n.page.ts # functions for app 02, page n
│   │   │   └── 📁 tests
│   │   │   │   ├── 📃 page_01.spec.ts # tests for app 02, page 01
│   │   │   │   ├── 📃 page_02.spec.ts # tests for app 02, page 02
│   │   │   │   ├── 📃 ...
│   │   │   │   ├── 📃 page_n.spec.ts # tests for app 02, page n
│   │   │   ├── 📃 config.json # config data for app 02
│   │   │   ├── 📃 package.json # scripts for app 02
│   │   │   ├── 📃 playwright.config.ts # config details for app 02
│   │   └── 📁 ...
│   │   └── 📁 app n
│   │   │   ├── 📁 data
│   │   │   │   ├── 📃 page_01.data.json # data for app n, page 01
│   │   │   │   ├── 📃 page_02.data.json # data for app n, page 02
│   │   │   │   ├── 📃 ...
│   │   │   │   ├── 📃 page_n.data.json # data for app n, page n
│   │   │   ├── 📁 fixtures
│   │   │   │   └── 📃 index.ts # app n specific fixtures
│   │   │   ├── 📁 locators
│   │   │   │   ├── 📃 page_01.locator.ts # locators for app n, page 01
│   │   │   │   ├── 📃 page_02.locator.ts # locators for app n, page 02
│   │   │   │   ├── 📃 ...
│   │   │   │   ├── 📃 page_n.locator.ts # locators for app n, page n
│   │   │   ├── 📁 pages
│   │   │   │   ├── 📃 page_01.page.ts # functions for app n, page 01
│   │   │   │   ├── 📃 page_02.page.ts # functions for app n, page 02
│   │   │   │   ├── 📃 ...
│   │   │   │   ├── 📃 page_n.page.ts # functions for app n, page n
│   │   │   └── 📁 tests
│   │   │   │   ├── 📃 page_01.spec.ts # tests for app n, page 01
│   │   │   │   ├── 📃 page_02.spec.ts # tests for app n, page 02
│   │   │   │   ├── 📃 ...
│   │   │   │   ├── 📃 page_n.spec.ts # tests for app n, page n
│   │   │   ├── 📃 config.json # config data for app n
│   │   │   ├── 📃 package.json # scripts for app n
│   │   │   ├── 📃 playwright.config.ts # config details for app n
│   └── 📁 utils
│   │   ├── 📁 base
│   │   │   └── 📁 web
│   │   │   │   ├── 📃 actions.ts # actions in web applications
│   │   │   │   └── 📃 screenshots.ts # screenshot functions
│   │   ├── 📁 functions (utility functions)
│   │   ├── 📁 packages (other reusable packages)
│   │   └── 📁 reports
│   │   │   └── 📃 custom-reporter.ts # custom reporter to pretty print in console
├── 📃 config.init.ts # configuration initializer
├── 📃 global-setup.ts
├── 📃 global-teardown.ts
├── 📃 package.json
├── 📃 playwright.config.ts # global config
So, why is the structure important 🤔
Coz’ it gives you the view of the things that you need to add for using this framework for a brand new application. The only problem is to know how to do it sequentially. For example, as soon as you look at the framework structure, you might already understand that you need app_name folder within the src/apps folder within which you would need to create all the sub-folders as shown.
The question is which one should I create first and how are these folders linked?
Moving on..
First things first. Listed below are the necessary pre-requisites for the framework implementation.
- Node JS - v18.1.0 or above (what I used while developing)
- IDE of your choice (VS Code recommended)
and… that’s it!
💁♂️ - If you want to use different versions of node in different projects, use nvm
Alright, now that we have completed the pre-requisites, let’s start with the rest of the implementation 🔰
Step # 1
Clone the git repo using the below command
git clone git@github.com:eric-stanley/playwright-framework.gitand cd into the cloned folder
Step # 2
Let’s assume that the application under test is named automation-practice
Start creating the necessary 📁 and 📃 using the below commands.
mkdir src/apps/automation-practice && cd src/apps/automation-practice && mkdir data && mkdir fixtures && mkdir locators && mkdir pages && mkdir tests && touch config.json && touch package.json && touch playwright.config.ts && touch data/home.data.json && touch fixtures/index.ts && touch locators/home.locator.ts && touch pages/home.page.ts && touch tests/home.spec.tsCopy the below code and paste it in src/apps/automation-practice/config.json. This file has the environment specific url’s for the AUT (Application Under Test)
{
  "env": {
    "dev": { "url": "https://magento.softwaretestingboard.com/" },
    "test": { "url": "https://magento.softwaretestingboard.com/" },
    "uat": { "url": "https://magento.softwaretestingboard.com/" }
  }
}
🔔 Assuming that we have the same url for all environments 😏
Copy the below code and paste it in src/apps/automation-practice/package.json. Here we define the commands that we use to trigger the necessary run
Note: This is a dependent file and will not run standalone. All dependencies for the framework is part of the main package.json which resides in the parent folder
{
  "name": "automation-practice",
  "version": "1.0.0",
  "private": true,
  "author": "Eric Stanley",
  "license": "MIT",
  "scripts": {
    "test": "APP_NAME=automation-practice NODE_ENV=dev playwright test",
    "test:debug": "APP_NAME=automation-practice NODE_ENV=dev PWDEBUG=1 playwright test",
    "report": "npx playwright show-report reports/playwright-report",
    "allure": "npx allure generate reports/allure/allure-result -o reports/allure/allure-report --clean && npx allure open reports/allure/allure-report"
  }
}
🔔 Change the author to your name
Copy the below code and paste it in src/apps/automation-practice/playwright.config.ts. This file has the app specific playwright config.
import { PlaywrightTestConfig, devices } from "@playwright/test";

const config: PlaywrightTestConfig = {
  testDir: "tests",
  testMatch: "tests/*.spec.ts",
  timeout: 30 * 1000,
  retries: 3,
  workers: 3,
  globalSetup: require.resolve("@home/global-setup"),
  globalTeardown: require.resolve("@home/global-teardown"),
  expect: {
    timeout: 20000,
  },
  use: {
    headless: true,
    actionTimeout: 0,
    trace: "retain-on-failure",
    ignoreHTTPSErrors: true,
    video: "on-first-retry",
    screenshot: "only-on-failure",
    acceptDownloads: true,
    colorScheme: "dark",
    launchOptions: {
      slowMo: 500,
    },
  },
  reporter: [
    ["list"],
    [
      "json",
      {
        outputFile: "reports/json-reports/json-report.json",
      },
    ],
    [
      "html",
      {
        outputFolder: "reports/playwright-report/",
        open: "never",
      },
    ],
    [
      "allure-playwright",
      {
        outputFolder: "reports/allure/allure-result/",
        open: "never",
      },
    ],
  ],
  projects: [
    {
      name: "chromium",
      use: { ...devices["Desktop Chrome"] },
    },
    {
      name: "firefox",
      use: { ...devices["Desktop Firefox"] },
    },
    {
      name: "webkit",
      use: { ...devices["Desktop Safari"] },
    },
  ],
};

export default config;
Now that we have completed the basic setup, let’s move on to step # 3
Step # 3
Let’s start with writing a basic test for verifying if the home page url contains a specific text and title equals a specific text
Starting with the data first. Add the below data in src/apps/automation-practice/data/home.data.json
{
  "urlContains": "softwaretestingboard",
  "title": "Home Page - Magento eCommerce - website to practice selenium | demo website for automation testing | selenium practice sites | selenium demo sites | best website to practice selenium automation | automation practice sites Magento Commerce - website to practice selenium | demo website for automation testing | selenium practice sites"
}
Now that we have the data in place, lets start writing the functions for the test. Add the below code to src/apps/automation-practice/pages/home.page.ts
import type { Page, TestInfo } from "@playwright/test";
import { test, expect } from "../fixtures";
import * as data from "../data/home.data.json";
import * as actions from "@utils/base/web/actions";

export default class HomePage {
  constructor(public page: Page, public workerInfo: TestInfo) {}

  async navigateToAutomationPractice() {
    await actions.navigateTo(this.page, process.env.URL, this.workerInfo);
    const url = this.page.url();

    await test.step(
      this.workerInfo.project.name +
        ": Check if URL contains " +
        data.urlContains,
      async () => expect(url).toContain(data.urlContains)
    );
  }

  async verifyPageTitle() {
    await actions.verifyPageTitle(this.page, data.title, this.workerInfo);
  }
}
At this point, you will get an error with the fixtures import line stating that, fixtures/index.ts is not a module. This is fine. We are going to tackle this next 😉
But before that, let’s take a moment to look at the code in home.page.ts. Basically, I have added two functions in this class; one for navigating to the home page navigateToAutomationPractice() and the other one to verify the title of the page verifyPageTitle(). The actions is a consolidated list of all actions (or atleast most of the actions) that you could possibly perform in a web page, since we will be using these actions in almost all of our pages, it’s only logical to have this as a separate utility!
Let’s tackle the fixtures error now. Add the below code in src/apps/automation-practice/fixtures/index.ts
import { test as baseTest } from "@playwright/test";
import CommonPage from "@common/pages/common.page";
import HomePage from "../pages/home.page";

type pages = {
  commonPage: CommonPage;
  homePage: HomePage;
};

const testPages = baseTest.extend<pages>({
  commonPage: async ({ page }, use, workerInfo) => {
    await use(new CommonPage(page, workerInfo));
  },
  homePage: async ({ page }, use, workerInfo) => {
    await use(new HomePage(page, workerInfo));
  },
});

export const test = testPages;
export const expect = testPages.expect;
export const describe = testPages.describe;
What we do here is basically extending the test object in @playwright/test to add all pages in our application, so that when we start writing our tests, we will be able to easily pull the page objects and its associated functions without creating a new object everytime when we need to access the home.page.ts which might inturn cause a lot of duplication in code. In other words, every time we access the test object from @playwright/test, it automatically injects all the app specific pages in it. Let’s see how it happens next
Add the below code in src/apps/automation-practice/tests/home.spec.ts
import { test, describe } from "../fixtures";

describe("Home", () => {
  test("Verify home page url and title", async ({ homePage }) => {
    await homePage.navigateToAutomationPractice();
    await homePage.verifyPageTitle();
  });
});
As you can see the second argument in the test object takes in a function and since we have already extended the homePage object within the test object, we are able to access it with in the function
And… that’s it ⏰
Now, before we run the test, there is one last place where we need to update few things which is basically the script object in package.json which is present in the parent directory.
Remember, this is not the
package.jsonthat we edited in step # 2. This is the one that is present in your parent (root) directory
Add the below code in the scripts section in package.json file
    "test:automation-practice": "yarn workspace automation-practice test",
    "test:debug:automation-practice": "yarn workspace automation-practice test:debug",
    "report:automation-practice": "yarn workspace automation-practice report",
    "allure:automation-practice": "yarn workspace automation-practice allure"
Once you are done with editing the package.json file in your root directory, you package.json file would look something like below
{
  "name": "playwright-hands-on",
  "version": "1.0.0",
  "private": true,
  "description": "",
  "workspaces": ["src/apps/*"],
  "scripts": {
    "test": "yarn workspace ui-testing-playground test",
    "test:debug": "yarn workspace ui-testing-playground test:debug",
    "report": "yarn workspace ui-testing-playground report",
    "allure": "yarn workspace ui-testing-playground allure",
    "test:ui-testing-playground": "yarn workspace ui-testing-playground test",
    "test:debug:ui-testing-playground": "yarn workspace ui-testing-playground test:debug",
    "report:ui-testing-playground": "yarn workspace ui-testing-playground report",
    "allure:ui-testing-playground": "yarn workspace ui-testing-playground allure",
    "test:automation-practice": "yarn workspace automation-practice test",
    "test:debug:automation-practice": "yarn workspace automation-practice test:debug",
    "report:automation-practice": "yarn workspace automation-practice report",
    "allure:automation-practice": "yarn workspace automation-practice allure"
  },
  "author": "Eric Stanley",
  "license": "MIT",
  "devDependencies": {
    "@playwright/test": "^1.25.2",
    "@types/adm-zip": "^0.5.0",
    "adm-zip": "^0.5.9",
    "allure-commandline": "^2.18.1",
    "allure-playwright": "^2.0.0-beta.19",
    "colors": "^1.4.0",
    "playwright": "^1.25.2",
    "ts-node": "^10.9.1",
    "typescript": "^4.8.3"
  }
}
Step # 4
Time to test
If you are running the project for the first time run the yarn command from your parent folder to install all dependencies. Once you are done with installing the dependencies, run the below command
yarn test:automation-practiceIf you have done everything right, you might probably see something like below
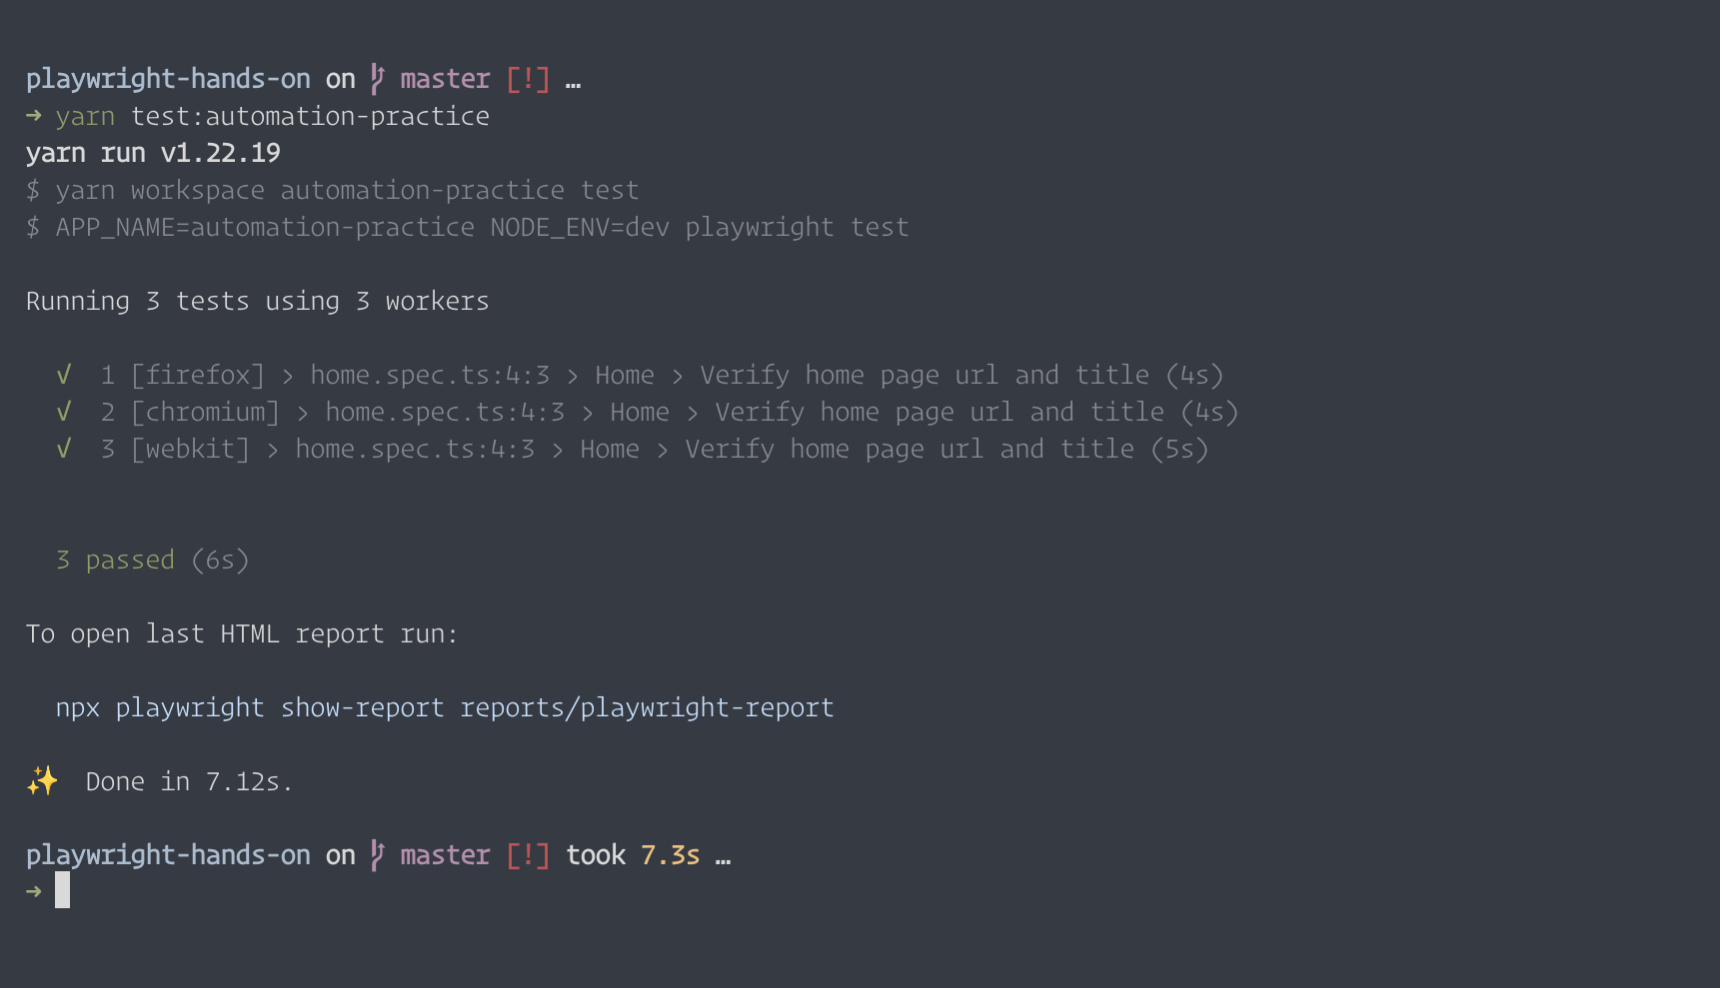
You might or might not get the Slow test file warning. You can play around with it by changing the timeout value in playwright.config.ts in src/apps/automation-practice folder
🙋 Now, does that mean that we are done?
Yep!
I told you that this post would be a long one and we have covered a lotta ground until now, but why do we have the home.locator.ts file in the locators folder. And how do we compare screenshots 🤔
Like I said, this could take some time, but at the same time, a lot has been already done. See you in the next post with implementing more features 🥏
Feel free to add your thoughts and comments in the comments section and I will try to address those in time ⏰